Showing posts with label simple recipe. Show all posts

Sunday, August 11, 2013

3 Bean Salad

I made this last week for something to take to work. I've been thinking about it for a long time, but just never got around to it. It's 3 Bean Salad and it's pretty yummy. It's a different take from the vinegar and oil based salads I've been making most of my life. When I was working in a family-style steakhouse, we bought this stuff pre-made in cans. It's so simple to make and costs a whole lot less. It also tastes better than the canned stuff.
3 Bean Salad
As you can see, the three beans are green, waxed and kidney. The green and waxed beans are the staple of the salad. If you like, you can replace the kidney beans with cannelli beans or limas or whatever you'd like. Black beans or black-eyed peas would be pretty and probably taste really good in here.

Here's the recipe:

3 BEAN SALAD

1 can cut green beans, drained and rinsed
1 can cut waxed beans, drained and rinsed
1 can kidney beans, drained and rinsed - I used dark kidney beans for the color contrast
1/2 green pepper, chopped
1/2 onion, chopped

Dressing
1/4 cup white vinegar
1/4 cup vegetable oil - if you use olive oil, it will coagulate until the salad warms up
1/4 cup white sugar
1/4 teaspoon celery seed
Salt and pepper, to taste

Mix the dressing ingredients together. Add to the beans. Stir and put into the fridge to chill for a couple of hours.

*You may need to double the dressing ingredients as this is just enough for my taste.*

This is pretty good to serve with just about any type of meal. It's nice on a hot day when you don't want to heat beans on the stove. It also is good to whip up if you know company is coming soon and you don't have much to serve. As long as the sugar dissolves, you can serve it lukewarm. In my opinion, it just tastes better if it's chilled.

Enjoy!

Take care and happy cooking.

Saturday, August 3, 2013

Banana Pancakes

Did you ever get a bunch of bananas and not get them all eaten? I'm sure all of us have had a bunch over our lifetime as a housekeeper. Right? It must be so since there are so many banana bread recipes out there. I made about 3 double batches of banana bread over the course of a month. Yeah. That's a lot. Each of my double batches makes one very long loaf, which I have a special pan for, and 3 mini loaves. A lot of these were given away.

SOOOO, this time, I decided to make some banana pancakes instead.
Banana Pancakes & Sausage
Were they good? Yep! Were there leftovers? Yep! Are they in the freezer for later? You bet!

I have my own recipe for the batter, which I've perfected over the years. The standard batter from cookbooks just don't turn out good for me. But the banana pancake batter is a little different because of the bananas. Here's how I did it.

BANANA PANCAKES

Dry Ingredients
2 cups white flour
1/4 cup white sugar
3 tsp baking powder
1 tsp baking soda
1/2 tsp salt
1/2 to 1 tsp cinnamon


Put all of this in a bowl and stir it together. If you decide to add chocolate mini-chips* to the batter, add them now, to the flour mixture and stir until they're coated.

Next
2 very ripe bananas mashed well with 1 tablespoon of lemon juice
1 tsp vanilla
1 tablespoon vegetable oil

Mix this together in a separate container.

Wet Ingredients

In a 1 cup measuring cup, put two eggs.
Put in a heaping tablespoon of sour cream or unflavored yogurt.
Stir together.
Add enough milk to this cup to make 1 cup of liquid.

Add the banana mixture and the wet mixture to the dry ingredients and stir well.
If you want your batter to be a little looser, add some more milk, a little at a time.

Cook on a greased hot griddle and serve with your favorite syrup or jelly.

I got about twelve 6" pancakes from this recipe. I use a 1/4 cup measuring cup to portion the batter.

In my opinion, these turned out really well. You can add chocolate mini-chips to the batter*, if you like. Also, I wanted to add nuts, but I didn't have any walnuts on hand. Raisins are good to add, too.

If you decide to try this, please come back and let me know in the comment section. I'll be very interested to see if you liked them.

Take care.


Sunday, July 21, 2013

Easy Cinnamon Biscuit Roll

I'm always on the lookout for easy recipes to add variety to our meals. Here is one I found on Mennonite Girls Can Cook. It is their Cinnamon Biscuit Roll. This is the exact recipe I used without any variations except I didn't glaze my roll.

As you can see on my blogroll, I have the Mennonite Girls' website listed. Every recipe I've ever made from this site has worked out great and tastes great, too. I've also made the Rhubarb Platz for company and work. You can substitute fruits so I did. We don't have rhubarb here, in South Carolina, so I used apples and cinnamon one time. I used apricot filling another time. Next time I'll use canned cherry pie filling or fresh blueberries. It is really a pretty presentation and tasty, to boot. However, it is too sugary and I won't make it for home. This is just something special I make for others.

If you haven't ever been to this site, it's well worth the browse. The recipes are great. The pictures are great. They give you a bit of a background about themselves. They have a special Sunday "Bread for the Journey", which is very inspiring.

Here is what my Cinnamon Biscuit Roll looked like.

Cinnamon Biscuit Roll
As you can see, it turned out pretty much like on the Mennonite Girls' website. It is nice and flaky and not very sweet. It's more like a biscuit in texture. It holds together well if you want to eat it with your fingers. If I were to serve this for company, I would either glaze it after baking, or sugar it before baking.

I hope you'll give this one a try and browse the Mennonite Girls' website.

Take care.

Tuesday, July 16, 2013

Yummy Dip

The company I work for sponsors a scholarship program for high school seniors and college students whose parents work in the industrial site I work in. The scholarships are generous and the funds for them are donated by each corporation at the site. The program is in memory of a gentleman who tragically lost his life after being hurt at the company I work for. This gentleman, Tyrone, was really interested in helping children any way he could. He was a coach and tried to instill good qualities in the children by his example. It has been 16 years ago that Tyrone passed, but through this program, he'll never be forgotten. I, myself, never had the chance to work with Tyrone. I hear about him through my coworkers.

My part in this program is helping with the event. I ordered a spinach artichoke dip to be served at the scholarship awards ceremony. It was fantastic! Of course, I don't have the recipe for the dip served, but I found a really good one at the Kraft site. Here it is. I served it with lightly toasted pita triangles, just like at the awards ceremony. Anyhow, it's really good and simple. I made it by this recipe with no deviation. My take is that it needed a bit more garlic. I would use two cloves of real garlic instead of the garlic powder. There is something to be said about real garlic. I guess 'pungent' would be a good word. However, I like yummy. ; )

I hope you like the little bit I shared with you about one of the best parts of where I work. I also hope you'll try this dip. I think you'll really like it! If that doesn't suit you, then you should browse the Kraft site. I get a lot of recipes from there.

Take care.

Saturday, March 30, 2013

Sauce

Today was sauce making day. I make sauce only a couple of times a year because it's an all-day affair. I buy sauce in a jar the rest of the year. However, I think that I'll be doing this more often. When I make sauce, I know exactly what is going into the batch. You have to take someone else's word of what is in commercially made sauce. Then there's the 4% unknown allowance...That's enough to make one sick, if you have an overactive mind like I do.
Homemade Spaghetti Sauce
No. We didn't have spaghetti for dinner. We had leftovers. However, we had some Italian-style food last night for dinner.
Macaroni and Meatsauce
This is one of my favorites since I can put dinner on the table in 30 minutes.

MACARONI AND MEATSAUCE

1 jar spaghetti sauce, chunky is best
1/2 lb pasta, cooked
1 lb ground beef

Brown the ground beef. Pour off extra fat, if there is any. Add jar of spaghetti sauce. Stir until warm. Add cooked pasta. Stir until coated and warmed through. Serve!

As you can see, there are a few extras in my sauce. I add chopped onions, peppers and canned diced tomatoes. But, if you get a chunky sauce, you don't have to add extras. Easy!!!

Have a delicious day!

Take care.

Thursday, March 14, 2013

More Biscuits!

I shared with you my recipe for baking powder biscuits a few posts ago. Now let me share with you my version of cheddar biscuits. They are similar to the ones you find in a famous restaurant, but I like my version better. Of course, I'm partial to my own cooking. But, hey! Who isn't partial to their own cooking?

Michelle's Better Cheddar Biscuits

Use my biscuit recipe from March 12, 2013.

Extra ingredients:
1 cup shredded cheddar cheese, or a little more if you like
2 teaspoons garlic powder

Mix all of the dry ingredients together, including the garlic powder. Add butter and shortening and cut into flour mixture until it is very well dispersed. Add cheddar and stir well until the cheddar is fully coated. Add milk. Stir until blended. Turn out onto floured surface. Fold and press dough upon itself 5 or 6 times. This will make layers. Cut and place onto an ungreased baking sheet. Bake at 425 degrees F for about 20 minutes. The biscuits will be nicely browned when done.

Here you have it! Right out of the oven they'll be nice and warm and tasty. Slather them with butter and eat! Yummy with chili, BBQ ribs, fried or baked chicken, etc. I even eat them for breakfast and snack!

Have a yummy day!


Tuesday, March 12, 2013

Biscuits, Anyone?

Baking Powder Biscuits
I thought I'd share my biscuit recipe with you since I tempted you with all of those other goodies I made this past weekend. I've used the same recipe from my Betty Crocker Cookbook for years. However, I got to experimenting a little and made a better tasting biscuit, IMHO. ; )

Michelle's Baking Powder Biscuits

2 cups white flour
3 teaspoons baking powder
1/2 teaspoon baking soda
1/2 teaspoon salt
1/4 cup of plain yogurt or buttermilk or sour cream
3/4 cup of milk
3 tablespoons of butter
3 tablespoons of shortening (looks like lard stuff)

Mix all of the dry ingredients together. Add butter and shortening and cut into flour mixture until it is very well dispersed. You shouldn't see any large lumps in the flour. Add milk and either plain yogurt or buttermilk or sour cream. I like using yogurt or buttermilk. Stir until blended. Turn out onto floured surface. Fold and press dough upon itself 5 or 6 times. This will make layers. Cut and place onto an ungreased baking sheet. I use a flat pizza stone. Bake at 425 degrees F for about 20 minutes. The biscuits will be nicely browned when done.

Enjoy!

Tuesday, July 26, 2011

Cooking for the Week

Here's what I do on Sundays. I know...day of rest. For me, cooking is fun. I don't consider it a chore.

I make dishes I can serve up quickly for the rest of the week. After two days, the leftovers go in the freezer for later. This helps out when I can't make something because of appointments.
White rolls. Here's my story with this. I've made bread for about 15 years now. I can never get it just right. My crumb is too coarse and the roll falls apart when you eat it. When we went on vacation, I bought a loaf of bread made by an Amish woman. It was heavenly! When I cut it, it was so light and airy I thought it would float away. Literally. It was moist, cut well and made great sandwiches. No dry crumbs with her bread. It had a nice shape. The top was rounded and high. Beautiful!

Now I had something to stack mine against. I knew it could be done and this Amish woman was a master of the bread baking. I went home and got out my recipe. I read the general directions for bread and I found no more clues. OK. I'm doomed to make lousy bread. Wrong! The thing I have never done is kneaded the heck out of it and get as much flour in it as possible before the dough rips. Bingo!!! It worked. I have light and fluffy bread rolls that are moist and tender and stay together. Ta da! 
 Croatian potato salad. It's simple and a lot less fat. Cook your potatoes like normal. Cut them and put into a bowl with some onions. I decided to use red onions for color. I usually use what's on hand and that is white onions. I love the onions from the garden and I chop the green tops into the salad for color. Waste not! Vinegar, oil, salt, pepper and about two tablespoons of Italian dressing for extra flavor. I give the Italian dressing a squirt, which is probably more than two tablespoons. The longer it sets, the better it is. I like it cold, but you can eat it warm, too.
 Pulled pork butt from the crock pot. Hubby loved it this time. It's usually pretty dry. This time, it was just right. It went great with the white bread rolls.
And, with some of the white bread dough, I made pepperoni and mozzarella rolls. You can cheat with this and used thawed, frozen bread dough. Roll out dough. Line up the pepperoni along one end. I used sandwich pepperoni. Add mozzarella. Roll. Rise. Bake. This time, I laid out the pepperoni and mozzarella over about 2/3 of the surface of the dough before rolling. It made a nice streak of meat and looks good for presentation. You can use any dry type of meat for this. Don't use cooked ham! It's too wet and makes a soggy heavy mess of the bread. Dry Virginia baked ham with cheese is good. The other Italian deli meats are probably good, too. Prosciutto, cappacola, sopressata, etc. Not cheap. Wouldn't a nice calzone be good with this dough? Hmmm.

I hope you enjoyed seeing my food prep for last week. Take care.

Have a simple day!

Monday, May 23, 2011

How Was Your Weekend?

Mine was pretty nice, thank you.

Here is a brief rundown of simple life in the country.

I was daydreaming at work last Friday and wondered what else I could make that I use a lot of. Well, here it is...da da da dahhhhh! Sour cream. How easy was that to make?


Get a very clean glass jar with a lid. Put one cup of heavy cream in it. Get a culture...use a 1/4 cup of a good sour cream you get in the grocery store. Make sure you get one that contains only cultured milk (hint: mine is named after a flower. Most others contain fillers.). Mix the two together, put on the lid and leave on the kitchen counter for at least 24 hours. It doesn't ferment, so there is no burping the container.

The taste was incredibly fresh and different than store-bought stuff. OK...I HAD to try it. I mixed a little with a teaspoon of sugar and topped my apple pie for breakfast. Yummy!!!


What is better than hanging sheets on the clothesline? Answer: being able to hang the sheets! I've not been able to do much for the past few months. It sure is great to be able to do stuff again! Even something as simple as hanging sheets on the line. This is the first of many hangings this year.


The Lantana is in bloom. I love this flower. It grows great in the heat and is pretty drought tolerant. We haven't had rain to speak of for a while and this looks great. The leaves have a stinky odor if you rub against it. The butterflies, bees, hummingbirds and hummingbird moths love it. It's really cool to see a whole family of hummingbird moths in this shrub all at once.


I've got a tomater! It's not a good picture, but it's dead center. Hubby and I have our own gardens. He gardens at yard level. I garden in boxes. For me, it's easier to pull weeds while sitting on the edge of the box. A lot of weeds are kept out by doing it this way, too.


Aren't these strawberry plants beauties? Well, they are Ozark Beauty strawberries. They are everbearers, but they are seasonal where we live. They are a cinch to grow. Look at all the new runners I'll be able to plant soon!


Our fire pit. Trixie's ready for evening fires. I spent all morning on Saturday pulling weeds from between the blocks. I also pulled the weeds from the sidewalk. This was my first major foray into yard work for a while. This is the second year for this area of our yard. Hubby leveled the land and prepared it for the block. I set the block. Believe it or not, I love laying block. I have to redo our pavilion patio because we relocated this block from there.

So...how was YOUR weekend?

Wednesday, May 18, 2011

EEEEWWWWW!!!

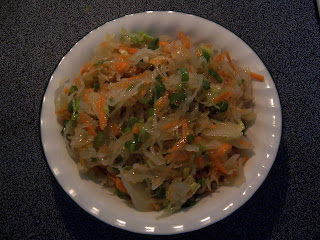
Saurkraut salad.  

WRONG!

YUM!

Once upon a time, very long ago, I dated a really great man. His Mom invited me over for dinner on Sundays or Saturdays, depending upon when we had a date. He always apologized for his Mom's cooking not being up to par.Well, let me tell you...she was a fantastic cook! I learned so much from her. Including this scary sounding salad.

Now, saurkraut salad...doesn't sound that great, does it? If you like saurkraut, even a little bit, you'll love this salad. It doesn't taste like saurkraut. It does have crunch and flavor.

Here's how you make this simple recipe.

Saurkraut Salad
Saurkraut, canned, in a jar or in a plastic bag
Crunchy veggies like celery, carrots, onions, radishes, cukes, green peppers, etc.
Equal parts white wine vinegar, cooking oil (not olive), sugar

Place equal parts white wine vinegar, cooking oil and sugar in a saucepan over low heat just until the sugar dissolves. Remove from heat to cool.

Place saurkraut in a colandar, rinse and drain well.

Peel and chop or grate your veggies.

Place saurkraut, veggies and cooled vinegar mix into a bowl. Stir well.

Salt and pepper to taste, if you like. It gives more color and flavor.

You may eat this at room temperature, but I like it best when it has been refrigerated until cold.

Crunchy, sweet and yummy!

Now, Mr. K, you were blessed with a great cooking Mom all of your years. You didn't even know it!

Monday, May 16, 2011

Yogurt

Have you ever looked at yogurt and thought 'I can make this!'? I did that. The lovely internet has a bunch of recipes to make your own yogurt. I use it instead of sour cream for just about everything...biscuits, muffins, pancakes, cakes, etc. You get the same fluffy texture and flavor as with sour cream.

Here is my recipe. You have to follow the instructions or it won't work. The instructions are very simple.

You'll need:

Stainless steel saucepan to cook on the stove. 2 quart is best unless you make a half batch.

ORGANIC yogurt leftover from what you bought in the store. About 1/4 cup or 2 tbsp for a half batch.
NOTE: DON'T use anything other than organic! It will not work! There are too many gums added to regular yogurt to thicken the milk and to give a creamy mouth-feel to it.

Milk. 2% or Whole. Whole makes a thicker yogurt.

Cooking thermometer.

Stainless steel whisk.

Clean plastic containers with lids.

Warm place to put it.

How to do it!
Put 4 cups of milk in the 2 quart saucepan. For this batch, I used 2%.

Heat the milk to 190 degrees F. Use the thermometer to check the temp from time to time. Don't let it go over 190 degrees and don't quit before it reaches 190 degrees. Don't worry if the milk sticks to the bottom of the pan. Sometimes it will get a little brown.

Take the milk off of the stove and let it cool to 110 degrees F. Use the thermometer to check. Don't let the milk go under 110 degrees.

Add yogurt. Whisk with whisk until you see no lumps.

Put milk into plastic containers and put on the lids.

Put containers in a warm place until they coagulate. You can be creative in how you process the yogurt.
You can wrap them in a towel and place them on a low heating pad.
You can preheat an oven to a temp of about 100 degrees F. Turn off the oven and wrap containers in a towel and put on the rack. Leave the door closed.
Wrap them in towels and put in the sun. Do not expose the milk to the sunlight.
*My favorite...I put them in my microwave with the night light on underneath. This stays just warm enough. If I put it in there at night, by morning I have yogurt. DO NOT MICROWAVE YOGURT. Take out the yogurt if you need to use the microwave. You can always put it back in.

**TIP: Put the yogurt in small containers or you'll have to wait forever for the center to set up.


Here's the lovely stuff! My homemade yogurt in a 1 cup container. I can't call it organic because I have store milk in it. I don't know what hormones are added to the milk. If you use organic milk, you'll be better off. However, 1/2 gallon of organic milk in my area is $5 for a 1/2 gallon! At this time, I can't afford that.

The taste is totally different from store bought! Yum!

Tuesday, May 3, 2011

Yum! Shortcake!

We've been picking strawberries from our garden for about a month, now.

Here's how we get rid of them...Yummy!


I hull the strawberries, slice them and add sugar to them. I use about 1-2 tablespoons of sugar. I cover and let them sit for a while in the fridge. This give the sugar time to melt and some of the strawberry juices to come out.

I make a 'Lazy Daisy Sponge Cake' recipe from an old Pillsbury Family Cookbook from 1963.

Lazy Daisy Sponge Cake

Ingredients:
2 tablespoons butter
1/2 cup milk, scalded
1 cup flour
1 teaspoon baking powder
1/4 teaspoon salt
2 eggs, well beaten
1 cup sugar
1/2 teaspoon vanilla extract

Grease a 9-inch layer pan. I used an 8" x 8" square glass dish so I can split the cake, if I want.
After milk is scalded, remove from heat and add the butter to it until the butter melts.
Sift together flour, baking powder and salt in one bowl.
Put eggs, sugar and vanilla in another bowl and beat until lemon colored.
At low speed, add dry ingredients.
Then mix in the milk and butter mixture.

Bake at 350 degrees F until a silver knife comes out clean. This will be about 30 minutes. Cool a bit and make your strawberry shortcake!

It takes me about 15 minutes to put together the cake and 20-30 minutes to bake it. The taste and texture is so much better than the rubbery little dessert cups you get at the store.

We ate 2 of these cakes one right after the other. I cut them into 9-pieces each. We had 18 shortcakes!

This is one of my favorite desserts ever! I also use blackberries on this cake and peaches, too! Use your imagination and enjoy this simple cake. You won't be sorry! 

Monday, May 2, 2011

Spaghetti Pie! Yum!

Here's one of my favorite things to do with leftover spaghetti. Yes! A spaghetti pie! Yes, we couldn't wait.

This is one easy thing to make. I don't remember where I got the recipe. I think it was word-of-mouth from an Italian friend.

Put in enough spaghetti in a bowl to fill an 8" or 9" pie plate. I fill the pie plate beforehand to make sure I have enough. Then I put it into a bowl. Then, lightly spray or grease the pie plate.

Scramble one egg and add to bowl. Stir egg into spaghetti really well. You can salt and pepper if you like. I usually don't because the toppings are flavorful enough.

Put eggy spaghetti into the pie plate.

Top with leftover, meats and veggies, then cheese. You may use the sauce, if you like. I left off the sauce on this one. I used a liberal amount of pepperoni in this one. It turned out really good. 

Put into the oven at 350 degrees F until a knife comes out of the center clean. I use a glass dish because I can look underneath to see that all is cooked.

Serve with more sauce and cheese.

Easy! Let me know if you like this recipe.